To my mind GWT is going to take the lead among the web application development tools. So this is the high time to start learning about GWT. Here I describe you how to create your first GWT application in Eclipse 3.4 (Ganymede).
If you have not installed Google plugin and SDK for eclipse please go to this page and follow the instructions.
Create your project
Select File-> New-> Web Application project. Enter "FirstGwtApp" for your project name and "com.ratul.FirstGwtApp" for the package name.

Create GWT entry point
Now you have to create an Entry point class which is similar to the main method in Java.
Right click on the "com.ratul.FirstGwtApp.client" and select New-> Class. Enter "HelloWorld" as the name of the class.

This class must implement the interface "com.google.gwt.core.client.EntryPoint".
So click on the Add button and write "entrypoint" in the choose interface text field.
Select the matching item.

Here is the code of the HelloWorld class
package com.ratul.FirstGwtApp.client;

import com.google.gwt.core.client.EntryPoint;

import com.google.gwt.event.dom.client.ClickEvent;
import com.google.gwt.event.dom.client.ClickHandler;
import com.google.gwt.user.client.Window;
import com.google.gwt.user.client.ui.Button;
import com.google.gwt.user.client.ui.Label;
import com.google.gwt.user.client.ui.TextBox;
import com.google.gwt.user.client.ui.RootPanel;

public class HelloWorld implements EntryPoint {

@Override
public void onModuleLoad() {
Label label = new Label("Enter your name:");
final TextBox textBox = new TextBox();
Button button = new Button("Click Here");
button.addClickHandler(new ClickHandler() {
@Override
public void onClick(ClickEvent event) {
Window.alert("Hello "+ textBox.getText());
}
});

RootPanel.get().add(label);
RootPanel.get().add(textBox);
RootPanel.get().add(button);
}
}
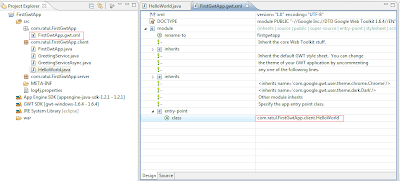
Now change the FirstGwtApp.gwt.xml in package com.ratul.FirstGwtApp to set the HelloWorld class as the entry point class of your application.

Create a Start HTML page
In the war folder you will find a file, named FirstGwtApp.html. Between the body tag write the following code
<!-- OPTIONAL: include this if you want history support -->
<iframe src="javascript:''" id="__gwt_historyFrame" tabindex="-1" style="border: 0pt none ; position: absolute; width: 0pt; height: 0pt;"></iframe>

<h1>Welcome to my first GWT Application</h1>
Configure the web.xml
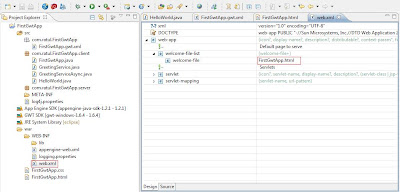
Go to war-> WEB-INF folder and there you will find a web.xml file. The Google Plug-in created this configuration file and placed a reference to a servlet.
Set the FirstGwtApp.html as the welcome file of your application.

You are only one step away from running your first GWT application.
Run GWT application
To run your application right-click the project and select Run As -> "Web application".
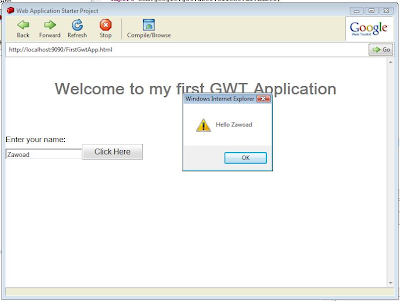
The result will be like this.

Enter your name in the text field and click on the button. Your name will be appeared in the alert window :).

18 comments:
Wow. Nice tutorial. It will be very helpful.
Did you use GWT 1.6 to make this tutorial? If so, that's helpful... if not, not so much.
Thanks for your comment Reechard. Yes i have used GWT 1.6 to make this tutorial. So i think you will find this helpful...
thank you
shuru korlam... aro tutorial dish...
Feed nie rakhish. inshallah aro pabi..
I had some trouble finding a nice tutorial, sor far this one was the best, thanks !
Hope my other tutorials will help you in future.
if it is possible to have the source code of this tutorial, it would be very helpful to me, because actually i find that some parts are missing in this tutorial. I followed all the steps mentioned above and the running result was not the same as you show... Anyone has an answer for me please
Source code is given in the tutorial. There is no more..
h1v??? I think it should be h1
@Hasan : Can't understand your question.
I think what Hasan is pointing to is line 4 of the html code. Should be h1, not h1v
Thanks for the tutorial - it's the best I have seen and used.
Thanks for pointing out the errors..
Useful site. It was very great stuff. Thanks for sharing it.
web design company
It can be time intensive and exhausting to take care of all the type handling.you achieve your career as soon as possible with types handling automated.
Hi, thank you very much for help. I am going to test that in the near future. Cheers
Form Processing
Can you give me an example that uses Ext GXT Grid and grid-data is coming from two or more table.
Post a Comment